유데미 웹개발 부트캠프 섹션 12

드디어 부트스트랩이 나왔습니다. css 지식으로 충만해지고 있는데 아직 프론트 엔드가 되고 싶은지는 모르겠습니다. 서버 쪽을 해봐야 알 것 같아요. 유데미 웹개발자 부트캠프 강의는 2022년 최신 버전이라고 알고 있는데 bootstrap은 4.5 version 이 나옵니다. 스파르타 웹개발 종합반에는 5.0 ver을 씁니다. (2022.10.25 기준) 방금 확인했는데 Bootstrap 5.2ver이 최신인 것으로 확인됩니다. 


일단 수업을 맞춰서 들어야 하니까 4.5 ver으로 다운받았습니다. 아래 강의 관련 질문에 보니까 앞에는 4. ver 쓰다가 뒤에 강의에는 5.ver가 나온다고 하네요. 


개발을 잘하게 될지는 아직까지는 미지수이지만 컴퓨터로 혼자 일 하는 것은 적성에 맞는 것 같습니다.

세상에 없는 무언가를 만드는 것도 어느정도 창의력을 요하는 일이라 재미있습니다.

CS 강의를 유튜브로 들으니 알고리즘이 여기저기 유명한 프로그래머들과 교수들의 강의를 추천해주는데 재밌습니다.

이제 알아 들을 수 있는 용어가 늘어서 그런 거 같기도 합니다. 

인상 깊었던 댓글은 Computer Science 라는 학문이 창시된 지 얼마 안 됐기 때문에 초기 이론, 언어 등의 창시자들을 아직까지 인터뷰할 수 있고 그 시대를 함께 살아간다는 거였습니다. 


마치 워런버핏이 근 30년 넘는 동안 발행된 거의 모든 투자 책에 언급되는데 아직도 살아서 주주총회 하는 것과 같은 느낌입니다.


Bootstrap은 스파르타 웹개발 종합반 강의 들으면서 많이 익숙해서 새로운 지식이라면

처음에 부트스트랩을 사용하려면 <head>에 link 태그를 넣어야 한다는 점입니다.

https://getbootstrap.com/docs/5.2/getting-started/introduction/


Get started with Bootstrap

Bootstrap is a powerful, feature-packed frontend toolkit. Build anything—from prototype to production—in minutes.

getbootstrap.com

위의 사이트에 친절하게 어떻게 해야 bootstrap을 사용할 수 있는지 나옵니다.

버전 별로 조금씩 다른 점이 있으니 원하는 버전을 선택해서 (저는 그냥 url에 버전 숫자 바꿔서 찾았습니다.) 세팅하면 됩니다.

유데미 web developer bootcamp section 12 Bootstrap 강의는 친절하게 메뉴 하나하나 설명해주면서 어떻게 쓰면 되는지 알려줍니다.


Bootstrap을 기억하고 타이핑을 해되지만 대게 복붙을 해서 쓰는데 이런식으로 쓸 수도 있다 정도로 모든 요소들을 설명해줍니다.

  • Bootstrap의 grid system의 row는 항상 12 units 가 최대 (e.g. 50% 하고 싶으면 'col-6' 그냥 col 만 있으면 evenly spaced)
  • bg-'색깔'
  • "col-6-md" -> 중간에 왔을 때 column으로 바뀌어서 stack이 됨
  • "col-6-md col-xl-3" ->중간에 왔을 때 1 column으로 바뀌어서 stack이 됨 -> 가장 큰화면일때 4개 유닛으로 나뉘어짐(3/12씩)
  •  <img class="img-fluid" src="" alt=""> :이 태그 넣고 위에 처럼 'col-xl-4' 같이 넣어주면 윈도우 크기에 따라 이미지 크기변경
  • Navbar


저는 2배속으로 계속 듣고 있습니다. 

외울필요는 없어보이지만 한번 들어놓으면 나중에 찾을 때 편리할 듯 합니다.


유데미 웹개발 부트캠프 섹션 11

Section 11 요약:

아래처럼 윈도우 크기 작을 땐 default 설정해서

default는 column으로 작업한다.


커지면 아래처럼 가로로 나오게 만들기를 했습니다.

반응형 웹사이트 css 연습

아래는 사용한 css 코드입니다.

html {
    font-family: 'Open Sans', sans-serif;
    box-sizing: border-box;
}

body {
    background-color: #60a9ff;
    display: flex;
    justify-content: center;
    align-items: center;
    min-height: 100vh;
}

.panel {
    background-color: white;
    border-radius: 10px;
    padding: 15px 25px;
    width: 100%;
    max-width: 960px;
    display: flex;
    flex-direction: column;
    text-align: center;
    text-transform: uppercase;
}

.pricing-plan {
    border-bottom: 1px solid #e1f1ff;
}

.pricing-plan:last-child {
    border-bottom: none;
}

.pricing-img {
    margin-bottom: 25px;
    width: 100%;
    max-width: 100%;

}

.pricing-header {
    color: #888;
    font-weight: 600;
    letter-spacing: 1px;
}

.pricing-features {
    margin: 50px 0 25px;
    color: #016ff9;
}

.pricing-features-item {
    font-weight: 600;
    letter-spacing: 1px;
    font-size: 12px;
    line-height: 1.5;
    padding: 15px 0;
    border-top: 1px solid #e1f1ff;
}

.pricing-features-item:last-child {
    border-bottom: 1px solid #e1f1ff;
}

.pricing-price {
    color: #016ff9;
    display: block;
    font-size: 32px;
    font-weight: 700;
}

.pricing-button {
    border: 1px solid #9dd1ff;
    border-radius: 10px;
    color: #348efe;
    display: inline-block;
    padding: 15px 35px;
    text-decoration: none;
    margin: 25px 0;
    transition: background-color 200ms ease-in-out;

}

.pricing-button:hover,
.pricing-button:focus {
    background-color: #e1f1ff;
}

.pricing-button.is-featured {
    background-color: #48aaff;
    color: white;
}

.pricing-button.is-featured :hover,
.pricing-button.is-featured:focus {
    background-color: #269aff;
    color: white;
}

@media (min-width: 900px) {
    .panel {
        flex-direction: row;

    }

    .pricing-plan {
        border-bottom: none;
        border-right: 1px solid #e1f1ff;
        padding: 24px 50px;
    }

    .pricing-plan:last-child {
        border-right: none;
    }
}

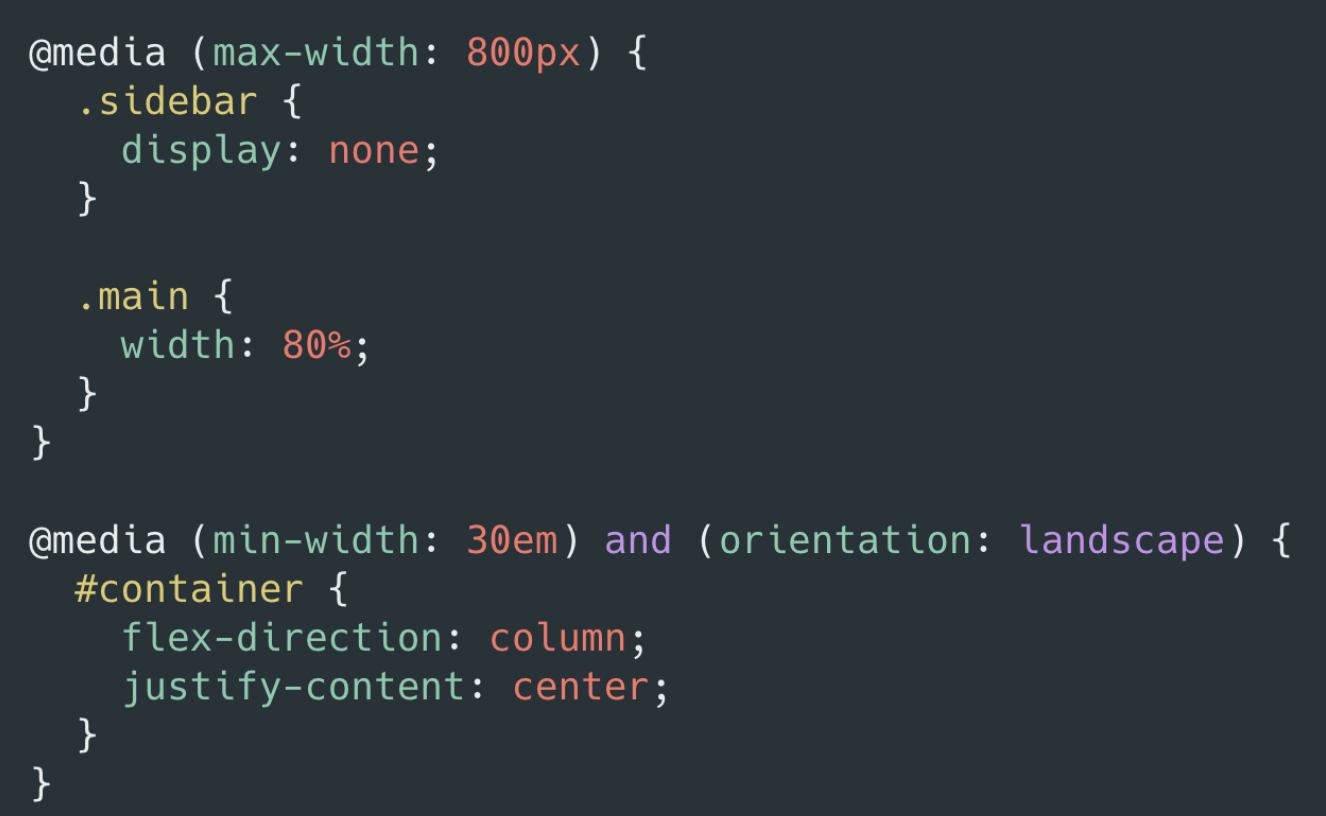
유데미 웹개발자 부트캠프 섹션 6~10을 한꺼번에 묶어서 쓰려고 했는데 어느 순간 h2 태그가 안먹히고 자동으로 h3가 되서 멈췄습니다. h 태그에 대한 갯수 제한은 원래 없다고 하는데 티스토리만 그런건지는 잘 모르겠네요. 너무 많은 개념을 한꺼번에 배우다보니 소제목을 남발했습니다. 얼른 css 끝내고 JavaScript로 넘어가려고 하는데 css강의는 section 13까지 있습니다. 오늘 섹션 13까지 끝내고 자는 게 목표입니다.  

유데미 웹개발 부트캠프 섹션 6~10

CSS Flexbox

  • Flexbox is a one-dimensional layout method for laying out items in rows or columns

the flex model

  • flex-direction: row(얘가 default), row-reverse, column, column-reverse;
  • justify-content: flex-start, flex-end,  center, space-between, space-around, space-evenly;
  • flex-wrap: wrap, warp-reverse, no wrap;
  • align-items: flex-start, flex-end, center, baseline;
  • align-content: center, space-between, space-around, stretch, fext-start, flex-end;
  • align-self: flex-end, flex-start; (한개 개체에 적용)


Flex Sizing Properties

  • Flex-basis: Defines the initial size of an element before additional space is distributed
  • Flex-grow: Controls the amount of available space an element should take up. Accepts a unit-less number value
  • Flex-shrink: If items are larger than the container, they shrink according to flex-shrink


Responsive Design (반응형)

  • 예전에는 기기 디스플레이에 맞게 일일히 디자인 해야했지만 지금은 하나 가지고 다 가능함


Media Queries

  • 반응형 웹사이트를 가능하게 함 (기기 사이즈에 따라 수정 가능)
  • @media (width, max-width, min-width, orientation, ...)

media queries


유데미 웹개발 부트캠프 섹션 6~10

Colt Steele의 The web developer bootcamp Section 6 부터는 css에 대한 강의입니다. 그래도 한 번 다른 강의 (스파르타 학원 웹개발 종합반 강의) 들었다고 아는 단어가 몇 개 들립니다. 섹션 하나 당 1시간에서 2시간 걸리는데 코드 따라치고 퀴즈도 풀다보면 거의 한 섹션당 5시간은 잡고 듣는 것 같습니다. 심지어 좀 아는 부분이라고 생각되는데도 그렇습니다. 유데미 웹개발자부트캠프 강의는 섹션 61까지 있습니다. 


원래 11월 7일 전까지 유데미 웹개발자부트캠프 강의를 다 들을려고 했는데 더 분발해야겠습니다. 대학생인 동생이 당분간 시험기간이라 새벽까지 공부한다고 하니 같이 조인해볼 예정입니다. 전체 강의의 앞부분은 프론트엔드의 역할에 대한 것들이라 얼른 백엔드 파트도 배우고 싶습니다. 


Sololearn 이라는 모바일 학습앱으로 이동하거나 생각날 때마다 JavaScript를 배우고 있는데 꽤 도움이 됩니다. Lesson이 59개로 나누어져 있는데 이제 27개 했습니다. 다음주 안으로 JavaScript를 마치고 Java로 넘어갈 예정입니다.


웹개발 종합반에서 Java와 JavaScript의 차이는 인도와 인도네시아라고 했습니다.


관련이 없단 얘기죠. 


CSS: Cascading Style Sheets | MDN

Cascading Style Sheets (CSS) is a stylesheet language used to describe the presentation of a document written in HTML or XML (including XML dialects such as SVG, MathML or XHTML). CSS describes how elements should be rendered on screen, on paper, in speech

developer.mozilla.org


CSS 연결하기

  • <link rel="stylesheet" href="app.css">
  • <head>사이에 넣는다</head>


Color

  • 이름있는 색깔 140개 있음
  • rgb (red, green, blue)
  • hex 

hexadecimal color code


Color Names — HTML Color Codes

HTML color names rule. Modern browsers support 140 HTML color names which we've listed here along with their Hex color codes and RGB values.

htmlcolorcodes.com


Color Picker — HTML Color Codes

Finding that perfect color is easier than you think. Use our color picker to discover beautiful colors and harmonies with Hex color codes and RGB values.

htmlcolorcodes.com


CSS Text Properties

  • text-align
  • font-weight: normal(400), bold(700), lighter, bolder, 100, 900
  • text-decoration: underline, underline dotted, overline, line-through, wavy, dashed, solid, none
  • line-height (줄간격)
  • letter-spacing (글자간격)
  • text-transfer: uppercase, lowercase, capitalize

font-size

  • font-size: 대부분 px(픽셀)을 사용함; 기기마다 환경에 따라 1 px가 다름

font-family


CSS Font Stack: Web Safe and Web Font Family with HTML and CSS code.

Join to access discussion forums and premium features of the site.

www.cssfontstack.com

  • font-family: 폰트명;


CSS Selectors

  • universal selector: * {  } 전체 다 지정
  • element selector: 해당 element 다 지정함; eg. img { }, button{ }
  • selector list: 여러개 같이 지정; eg. h1, h2 { }
  • descendent selector: body button { } -> body에 있는 모든 버튼을 지정
  • adjacent selector: h1 + p {} -> h1 바로 다음에 오는 p를 지정
  • direct child: > 사용해서 그룹 안에 요소 지정

ID selector

  • #아이디 { }
  • 한 번만 사용함

Class selector

  • 그룹으로 묶어서 사용
  • .클래스이름 { }

Attribute selector

  • 레이블된 "타입"을 모두 지정
  • input [type="text"] {   } -> input 안에 "text"를 지정함


Trending Color Palettes - Coolors

Get inspired by thousands of beautiful color schemes and make something cool!

coolors.co


Pseudo classes

  • keyword added to a selector that specifies a special state of the selected element(s)
  • :active -> 누르면 변하게
  • :checked -> 체크하면 변하게
  • :first
  • :first-child
  • :hover -> 마우스 올라가면 변하게
  • :not()
  • :nth-child()
  • :nth-of-type() -> n번째 타입이 변하게; 홀수 (2n-1) 짝수 (2n)


Pseudo elements

  • Keyword added to a selector that lets you style a particular part of selected element(s)
  • : 원래는 두개 써야하지만 크롬에서는 한개 써도 됨
  • ::after
  • ::before
  • ::first-letter
  • ::first-line
  • ::selection


The Cascade

  • 순서가 중요함 (The order your styles are declared in and linked to matters!) 마지막에 한 걸로 됨
  • Specificity:  ID > CLASS > ELEMENT (더 구체적인 게 이김)
  • https://specificity.keegan.st/
 

Specificity Calculator

Specificity Calculator A visual way to understand CSS specificity. Change the selectors or paste in your own.

specificity.keegan.st


Inline Styles

  • 거의 아무도 안씀
  • 비효율적

!important

  • 다른 것들을 다 이기는 스타일이다! Specificity 다 이김
  • 잘안씀

CSS Inheritance

  • 상위 개체의 스타일 그대로 받아옴


Border 

  • border-width (두께) 랑 border-style (solid, dashed, dotted, inset)같이 해야 보임
  • width style color 순을 써도 됨
  • border: 2px solid red;


Padding, Margin

  • padding: 박스 안 들여쓰기
  • margin: 박스 간격 띄우기


Display properties

  • display: inline, block, inline-block, none


CSS Units

  • px: 가장 많이 사용되는 단위; 반응형에는 권장하지 않음
  • %: 상대적인 비율 
  • em: With font-size, 1em equals the font-size of the parent. 2em's is twice the fontsize of the parent, etc. EM'S ARE RELATIVE UNITS With other properties, 1em is equal to the computed font-size of the element itself. 
    • 바로 위에 parents를 기준으로 함
  • rem: Relative to the root html element's font-size. Often easier to work with. ROOT EMS If the root font-size is 20px, 1 rem is always 20px, 2rem is always 40px, etc.
    • 최초 root element를 기준으로 함
  • vh : viewheight: 1vh is 1% of the height of the viewport
  • vw: viewwidth: 1vw is 1% of the width of the viewport


Opacity & Alpha Channel

  • Alpha Channel: rbga(red, blue, green, alpha) -> 색깔만 투명해짐
    • hex 는 00 to FF
    • rbg 는 0 to 1
  • opacity -> 전체적으로 (포함된 elements 다) 투명해짐


Position Property

  • https://developer.mozilla.org/en-US/docs/Web/CSS/position
  • static: 다른 스타일 설정해도 효과 없는 상태임 (default 상태를 유지함)
  • relative: 기존 default position 대비 움직이고 다른 element에는 영향 없음
  • absolute: The element is removed from the normal document flow, and no space is created for the element in the page layout. It is positioned relative to its closest positioned ancestor, if any; otherwise, it is placed relative to the initial containing block. Its final position is determined by the values of top, right, bottom, and left.
  • fixed: 항상 고정되어 있음. The element is removed from the normal document flow, and no space is created for the element in the page layout. It is positioned relative to the initial containing block established by theviewport, except when one of its ancestors has atransform,perspective, orfilterproperty set to something other thannone(see theCSS Transforms Spec), or thewill-changeproperty is set totransform, in which case that ancestor behaves as the containing block. (Note that there are browser inconsistencies withperspectiveandfiltercontributing to containing block formation.) Its final position is determined by the values oftop,right,bottom, and left.
 

position - CSS: Cascading Style Sheets | MDN

The position CSS property sets how an element is positioned in a document. The top, right, bottom, and left properties determine the final location of positioned elements.

developer.mozilla.org


CSS Transitions


CSS Transforms

css transform


유데미 웹개발 부트캠프 섹션 4-5

The web Developer Bootcamp 유데미 강의에서는

developer.mozilla.org 를 강의 자료로 활용을 많이 하는데 확실히 도움이 됩니다.

친절하게 정의랑 여러가지 자료들이 잘 정리되어 있습니다.

오늘 항해99 사전스터디 미팅에서 나온 단어 중에 html5semantic elements가 나왔는데

바로 오늘 유데미 강의에서 정리해줘서 좋았습니다.


저는 이러한 자료들(mozilla 사이트 등)을 조원들이랑 공유하고 싶은데

영어라서 조금 조심스러운 면이 있습니다.

구글이 잘 번역해주니까 괜찮지 않을까 싶기도 해요.

일단은 보류입니다.


HTML5

  • a buzzword that refers to a set of modern web technologies. This includes the HTML Living Standard, along with JavaScript APIs to enhance storage, multimedia, and hardware access.
 

API - MDN Web Docs Glossary: Definitions of Web-related terms | MDN

An API (Application Programming Interface) is a set of features and rules that exist inside a software program (the application) enabling interaction with it through software - as opposed to a human user interface. The API can be seen as a simple contract

developer.mozilla.org

Inline elements

  • <span>: a generic inline container for phrasing content, which does not inherently represent anything. It can be used to group elements for styling purposes (using the class or id attributes), or because they share attribute values, such as lang. It should be used only when no other semantic element is appropriate. 

Block elements

  • <div> :the content division elements

other elements

  • <hr> : 가로 라인 만듦
  • <br>: break 줄바꿈
  • <sup>: superscript 작은 글자 위에
  • <sub>: subscript 작은글자 밑에

HTML Entity codes

  • 코딩 기호들이랑 겹칠수 있는 기호들 (>,<,;, 등등)을 대체해서 쓰는 코드들
  • ex) < = &lt;
  • 검색하면 나옴

Semantic Markup

  • relating to meaning
  • <div>만 있는 거 대신 <main>, <header>, <nav>, <footer>, <section> 등 직관적인 이름을 붙여서 씀
  • <main>: dominant content of the <body> of a document
  • <nav>: provide navigtion links (menus, tables of contents, and indexes)
  • <section>: 말그대로 섹션
  • <article>: self-contained composition in a document, page, application, or site (e.g. a forum post, magazine, newspaper article, blog entity)
  • <aside>: a portion of a document whose content is only indirectly related to the document's main content (sidebars, call-out boxes)
  • <header>: 헤더는 헤더
  • <footer>: 풋터도 풋터
  • <time>: represents a specific period in time (24-hour clock,, calender, datetime ...)
  • <figure>: figure, its caption, and its contents are referenced as a single unit.
    • <figure><img src="url" alt="desc"><figcaption>caption</figcaption></figure>
  • <abbr>, <data>, etc...

Screen reader

  • command + f5
  • vocie over 기능

Emmet

  • VScode 에서 html 빨리 쓸수 있게 도와주는 프로그램


HTML Tables

  • <td>: The Table Data Cell element - a cell of a table that contains data..
  • <tr>: table row element
  • <th>:header cell element
  • <thead>, <tbody>, <tfoot> :semantic markup
  • <Colspan> : column 만듦 (줄 몇개 차지)
  • <Rowspan>: row (열 몇개 차지)

Form Elements

  • <form>: a shell or container that doesn't have any visual impact; fill the form with a collection of inputs, checkboxes, buttons, etc.
  • represents a document section containing interactive controls for submitting information
  • the action attribute specifies WHERE the form data should be sent
  • The method attribute specifies which HTTP method should be used


<input>

  • create a variety of different form controls (20+ possible types ...)
  • 여러가지 input type 예시들
<form action="/tacos">
        <input type="text" placeholder="username">
        <input type="password" placeholder="password">
        <input type="color">
        <input type="number" placeholder="숫자">
        <input type="range">
    </form>
 

input types and placeholder

Label

  • a caption for an item in a user interface
  • <label>
  • <label>이 안에 <input>넣는게 더 일반적(굳이 id 안넣어도 됨)</label>
<form action="/tacos">
        <p>
            <label for="username">Enter a username:</label>
            <input id="username" type="text" placeholder="username">
        </p>
        <p>
            <label for="password">Enter a password:</label>
            <input id="password" type="password" placeholder="password">
        </p>
        <p>
            <label for="color">Enter a color:</label>
            <input id="color" type="color">
        </p>
        <p>
            <label for="number">Enter a number:
            <input type="number" placeholder="숫자">
            </label>
            
        </p>


    </form>

label 예시

Buttons

  • <button></button>
  • <form action="">이 가라는 곳으로 submit 한다.

Name

  • <name="이름"> 인풋에 사용
  • file:///tacos?username=Jenni&password=jennifer&color=%236f2f2f&num=3
 <form action="/tacos">
        <p>
            <label for="username">Enter a username:</label>
            <input id="username" type="text" placeholder="username" name="username">
        </p>
        <p>
            <label for="password">Enter a password:</label>
            <input id="password" type="password" placeholder="password" name="password">
        </p>
        <p>
            <label for="color">Enter a color:</label>
            <input id="color" type="color" name="color">
        </p>
        <p>
            <label for="number">Enter a number:</label>
            <input type="number" placeholder="숫자" id="number" name="num">
        </p>
        <button>submit</button>


    </form>


구글, 유튜브, 레딧 검색창 뺏어오기

 <form action="https://www.reddit.com/search">
        <h1>검색하기</h1>
        <h2>레딧 검색하기</h2>
        <input type="text" name="q" placeholder="reddit.com">
        <button>Search reddit</button>
    </form>


    <form action="https://www.google.com/search">
        <h2>구글 검색하기</h2>
        <input type="text" name="q" placeholder="Google.com">
        <button>Search Google</button>
    </form>

    <form action="https://www.youtube.com/results">
        <h2>유튜브 검색하기</h2>
        <input type="text" name="search_query" placeholder="Youtube.com">
        <button>Search Youtube</button>
    </form>

Hijacking Google & Reddit Search

Radio buttons, Checkboxes & Selects

  • Checkbox: 
<input type="checkbox" name="agree_tos" id="agree" checked>
<label for="agree">I agree to everything</label>
 
  • Radio button:
 	<label for="xs">XS:</label>
            <input type="radio" name="size" id="xs" value="xs">
            <label for="s">S:</label>
            <input type="radio" name="size" id="s" value="s">
            <label for="m">M:</label>
            <input type="radio" name="size" id="m" value="m">
  • Selects:
  <label for="meal">Please select a Meal Type.</label>
            <select name="meal" id="meal">
                <option value="fish">Fish</option>
                <option value="meat" selected>Meat</option>
                <option value="veg">Veggies</option>
                <option value="wat">Water</option>
            </select>

Radio buttons, Checkboxes & Selects


Range & Textarea

Range

<label for="cheese">amount of cheese</label>
            <input type="range" name="cheese_level" id="cheese" step="1" min="1" max="10" value="3">

Textarea

 <label for="text">any special requests?</label>
            <br>
            <textarea name="text" id="text" cols="30" rows="3" placeholder="I request..."></textarea>

range and textarea

HTML5 Validations

  • 글자수나 포맷에 제한 주기 
  • required : 필수입력
  <label for="first">Enter First name</label>
        <input type="text" name="first" id="first" required>
        <button>Submit</button>

  • minlength: 최소 글자수
  • maxlength: 최대 글자수
  • min, max: 최소치, 최대치 (숫자)
  • pattern: 암호, email, url 등등

<label for="email">Type email...</label> <input type="email" name="email" id="email" required>


+ Recent posts